Sensory bins are a great way to give your child access to sand play, water play, and other fun materials, but leaving bins like this open all day long is an invitation for sandstorms and puddles to invade the room. Let’s make a circular sensory bin cover this week on Toddler Town!
I’ve made several of these covers for my daycare in a variety of prints: Elmo, Thomas the Train, and Care Bears. I found these prints for $4/m at Fabricland. Cute stuff at quite a bargain price!


What you need:
- sensory bin / water table
- fabric (approx 105″ or 2.6m if you don’t want any seams in the overhanging piece. You can piece it to use less if desired.)
- scissors
- piece of cardboard as large as the top of your sensory bin
- 2 pencils
- string
- fabric pen (optional)
- ribbon or grosgrain (optional) to tie the cover on if desired
- snaps (optional) to secure the ribbons/grosgrain
 First we must measure the diameter of the bin. The sensory bins featured in this article are by Step2. These bins are wider in some areas than others, so I measured across the top and accounted for the widest area so the cover will fit snuggly but not so tight that it’s difficult to fit on. (33 inches)
- Draw a circle with your diameter onto a large piece of cardboard. Tip: to draw a circle onto a piece of cardboard, you can cut a piece of string a little larger than the radius of your circle (half the diameter, so 16 inches in this case) and tie the ends to two pencils. Make a hole in the centre of your cardboard and stick one pencil in, then pull the string taught and draw the circle, making sure to keep both pencils straight up and down.
 Cut out the cardboard circle. Using this cardboard circle as a template, trace the circle onto the backside of your chosen fabric with a fabric pen or pencil. Cut it out. Now the top is ready, so now we are onto the fabric that will hang over the sides of the bin.
- Math time! We need to calculate the circumference of the circle to figure out how much fabric we need. Remember elementary school? Multiple the value of pi (3.14) by your diamter, plus 0.5″ for seam allowance (0.25″ for each end). In our case:
33? = 103.62 + 0.5, or 104 1/8″ - Decide how much you want the fabric to overhang. Do you want it to just overhang the bin, or do you want it to reach the floor? I wanted it to be in the middle, so I chose 8.5″, or 9″ allowing for seams.
- Cut a length of fabric the width and height you just figured out. In our example, it would be a 104 1/8″ by 9″ piece of fabric.
- With this piece of fabric, put the right sides together and sew a line along the 9″ side, creating a continuous loop of fabric. Hem one of the long edges of the fabric by folding a 1/4″ seam and sewing, then folding it up again and sewing once more.
- Now you should have a circular loop of fabric and a circle top of the fabric. Pin the circle top to the loop with the right sides together. Sew the two parts together, then turn the fabric right side out. You now have a beautiful sensory bin cover that will hide the sensory bin until it’s open and ready for use.
 If desired, you can sew on ribbons with snaps sewn on to secure the cover around the legs, though honestly, I find that if a toddler wants to get into the sand, they will. They’re smart and can open this fairly easily (haha). It’s easier just to teach them that when the cover is on, it’s not time to play with the sensory bin. When the cover is removed, it is okay to play in the bin and get a little messy. If you feel like your tile floor is safer with the fasteners, cut a length of ribbon that will reach around each leg and attach one half of a snap to each end of the ribbon as pictured. Ignore my terrible hand-sewing skills, okay? Eek!
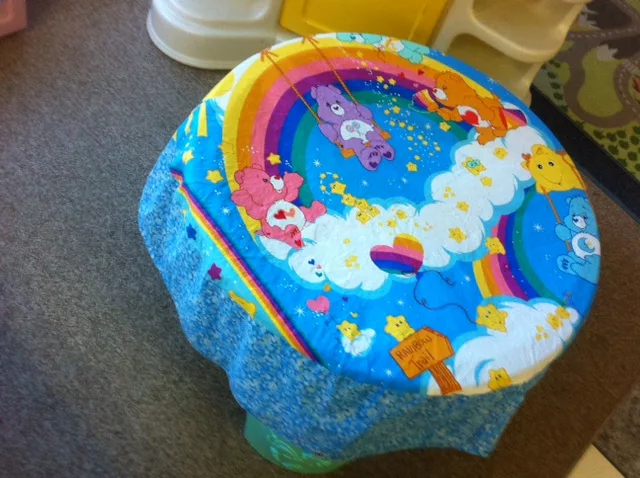
 If you can find a panel print (a large-scale non-repeating design on fabric) rather than an all-over repeating print, try lining up the cardboard circle template around the best parts of the panel design like in this Care Bears bin cover I made. I used a different fabric, a blue star print, that I had in my stash that just happened to match the panel.
Unconventional Sensory Materials
Sand and water are the obvious choices for filling your sensory bin, but what about more unconventional materials? (Always supervise children in sensory bins to ensure that they don’t eat anything or tip the bin over.)
- uncooked rice
- uncooked noodles
- ripped up tissue paper
- leaves from outdoors with plastic bugs to hunt
- shaving cream
- soapy water with baby dolls, wash cloths, and cups
I hope that this tutorial has inspired you! Happy crafting in Toddler Town!