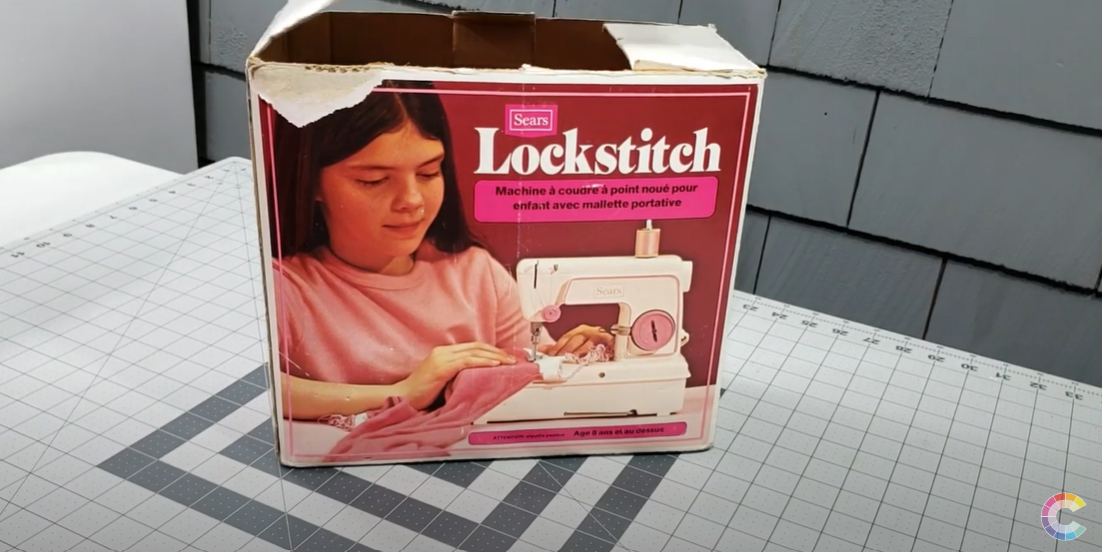
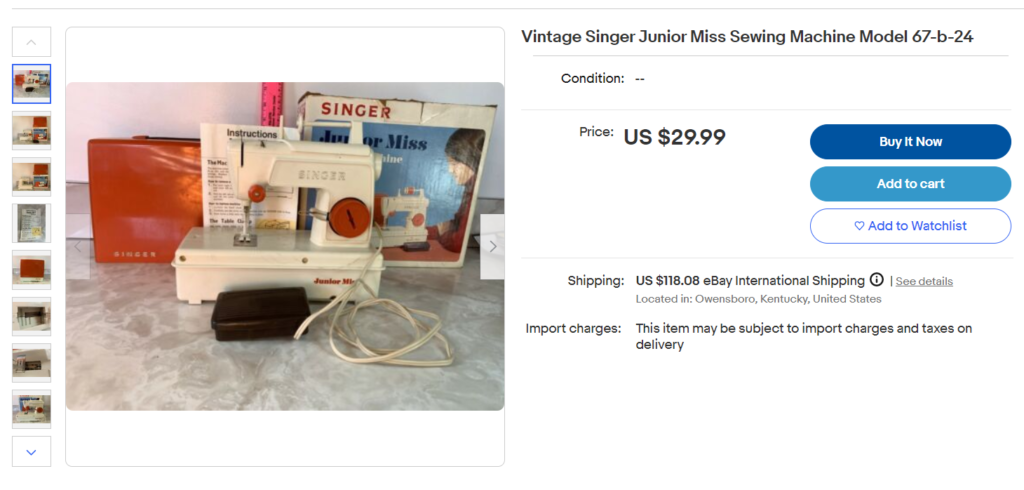
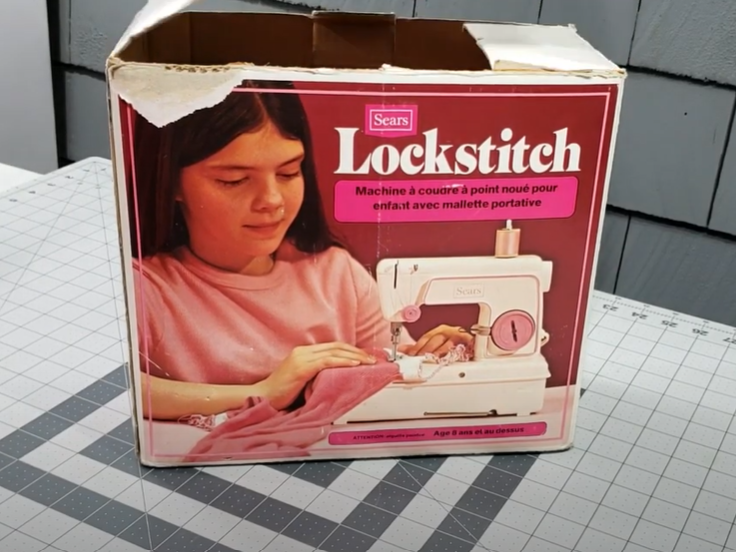
Check out at this sweet pink children’s sewing machine that I won on an online auction for a whole $6.00. This is the Sears Lockstitch Child’s Sewing Machine, model number 49 19741. I couldn’t find out much about the history of this machine online. The box says that it was made in France, and it was imported for the Canadian market for Simpsons Sears. I assumed that this machine is from the 1970s or early ‘80s since Simpsons-Sears officially changed its name to Sears Canada in 1984. This article was originally created as a video tutorial, and one of the commenters, David, let me know it was a 1974 model. The Sears Lockstitch Child Sewing Machine is a rebranded Singer Junior Miss Sewing Machine.

I did a quick search on Ebay and was able to find the Singer Junior Miss version easily. This model below is quite similar, though there are some differences right off the bat that I noticed, like the spool pin’s orientation.
I’ve provided a transcription of some of the key topics below in case you’d rather read about about it than watch my demonstration.
Sears Lock Stitch Child Sewing Machine Video
Let’s unbox this! First, take note that the little girl on the box is sewing on her machine backwards. She’s a skilled child, isn’t she?
First impressions
The Sears Lockstitch Child’s Sewing Machine, model number 49 19741 sewing machine is very lightweight and plastic-y. The foot pedal is pretty tiny, but this is for kids, so that’s fine. Something inside my machine is bouncing around, which isn’t a good sign. But what is a good sign is that the machine is not jammed when moving the handwheel. Thank goodness.
It includes a Butterick pattern for a little girl’s dress inside the box. It looks like the previous owner took it out of the envelope but didn’t cut into the pieces.
I’m so glad that the manual is included. I’ll include some photos of the manual at the end of this article for your reference since I couldn’t find a digital copy of it available anywhere online.
Look at this adorable bobbin case and these tiny bobbins!


What isn’t in the box is the hand crank that slides into the handwheel. Too bad!
There is a battery compartment on the bottom and the side features a DC input (adaptor sold separately). I’m ready with a set of D batteries.
I mentioned this machine is very light weight. To make sure it doesn’t just fly off your table while sewing, you’ll need to clamp it to your table with the metal hook.
Let’s start by turning on the on switch. The switch is on the foot pedal.
Winding the Bobbin
I’m going to be honest here: winding a bobbin on this machine is pretty difficult compared to any adult sewing machine I’ve ever used. I feel sorry for children who had to struggle with this.
Before we start, remember, that I don’t have the handcrank piece. The instructions say to use the handcrank when starting the bobbin. Keep in mind that if you use the handcrank that you will need to remove it anytime you are using the foot pedal.
Start by turning the handwheel until the needle is raised as high as it can go. Pop a spool of thread onto the spool pin, pull the thread to the metal thread guide, then pull the thread towards the handwheel. Bring about two inches of thread through the hole in the rim of one of the bobbins, from the inside out.
You can see there is a bobbin winder spring to the left of the handwheel. Gently press on it and place the bobbin on it, with the threaded end facing forward.
Hold the thread end and turn the handwheel clockwise a few times to get the bobbin started. Snip off the extra thread that is hanging from the bobbin rim.
Continue to wind the bobbin. You can switch to the foot pedal now instead of the handcrank. Fill until the bobbin is full. You’ll need to use your fingers so that it winds evenly because it naturally wants to just wind in one area instead of filling up the entire length of the bobbin..
Note: The machine came with a little piece of paper in the box, warning that you need to manually apply pressure to the bobbin so that the bobbin will actually catch against the mechanism. This seems like a huge design flaw, and the fact that it’s not included on the main instructions makes me think that this was a manufacturing issue and not the intended functionality. Hmmm, suspicious?!
Anyway, you can see in the video, it’s a struggle to get the bobbin to wind both evenly and with proper tension.
TROUBLESHOOTING – Behind the Scenes
Something to watch out for if you are having difficulty winding the bobbin: check to make sure that the bobbin isn’t damaged. One of the three bobbins included with the machine didn’t include a proper hole in the rim. The thread kept popping out of the groove, and it wasn’t until I compared my bobbins that I realized what the problem was.
How to Insert the Bobbin
Leave a tail hanging down from your bobbin, then slide the bobbin into the bobbin case. Hold your finger at the end of the bobbin to keep it from moving, and pull the thread into the slot of the bobbin case and up under the tension spring.
Holding the bobbin carefully, insert the bobbin into the bobbin case holder with the flat side forward. Hold the thread end and close the slide plate. Leave at least 2 inches hanging outside the slide plate.
How to Thread This Machine
Start by making sure the needle is as high as it will go.
Place a spool of thread on the spool pin. Pull the thread through the first thread guide. Pull the thread down and between the tension discs, then back up through the take up lever. Pull the thread down to the needle and thread it from front to back.
Bring up the bobbin thread by holding the tail of the top thread in your left hand. Turn the handwheel until the bobbin thread appears as a loop. Pull the loop with your fingers and pull both the top and bottom threads under the foot of the machine. You’re ready to sew!
You can sew with either the handcrank if you have it, or the foot pedal. Here is an example of what the stitches look like, keeping in mind that I haven’t done much tension adjustment yet. I’m not super worried about getting a perfect stitch, because honestly, I don’t plan to actually use this machine for sewing garments. I’ll just be keeping it as a novelty item on my shelf.
TROUBLESHOOTING:
If the tension is too tight, the bobbin will just pop out of the bobbin case and cause you big problems. If this happens, loosen the tension by turning the tension dial to the left.
Other Things to Note
- According to the directions, this machine takes a Style No 2020 (15×1) needle, Size 14.
- Since it’s battery operated, if you know you aren’t going to be using it for a while, be sure to remove the batteries to prevent corrosion.
Opinion Time
Now that I’ve shown you the basics of how to use this machine, I’m going to share some of my personal opinions about it.
First, what I love about it:
- I’m a sucker for pink. This machine is adorable.
- I love that it includes its own carrying case to keep it from getting dusty or damaged
- The machine is lightweight and easy to take with you.
- I love that it’s a real sewing machine with a real needle – some of the more modern kid sewing machines I’ve seen totally barricade the needle area, which limits what you can do. Most kids are capable of understanding that the needle will be sharp and to be careful.
But, there are things I dislike about it:
- There is a fake handwheel on the side that you naturally want to try to turn, but this machine’s mechanism is totally on the front.
- There doesn’t appear to be any way to adjust stitch length, limiting creativity.
- As I mentioned during the bobbin winding segment, winding the bobbin is just awful and the results are not clean. I think if I was given this as a gift as a kid, the frustration would have resulted in me not wanting to sew with the machine at all.
These types of child sewing machines, although adorable because of their small size, have the downside of being made with cheaper materials and simplified mechanics. If I were to buy a machine for a child, I would go for one of these options instead:
- Option 1: I would buy an all-metal vintage straight stitch machine that has stood the test of time. I think I Singer 99 or Singer 15 would be perfect and can usually be found cheaper than the cheapest plastic machines from a big box store.
- Option 2: If I wanted to ensure that I got a warranty, I would opt for the most inexpensive starter machine from a big box store made for adults. I think the value of an adult sewing machine far outweighs the limited functionality of a child sewing machine.
I kind of went off on a rant there, didn’t I? I’m a bit passionate about allowing children the opportunity to learn the skills that they want to with equipment that won’t limit their experience. If they are responsible enough and are being supervised, I’m all for kids using the real deal.
Verdict: When my son is a little older, I know I will not be teaching him how to sew on this Sears sewing machine. However, the machine is cute, and I like having a piece of history now that Sears Canada is fully out of business.
I’d love to hear your thoughts on the subject, so feel free to leave me a comment on this blog post or on my video comments. Also, do you or did you own this Sears sewing machine? If you know anything more about it please let me know!
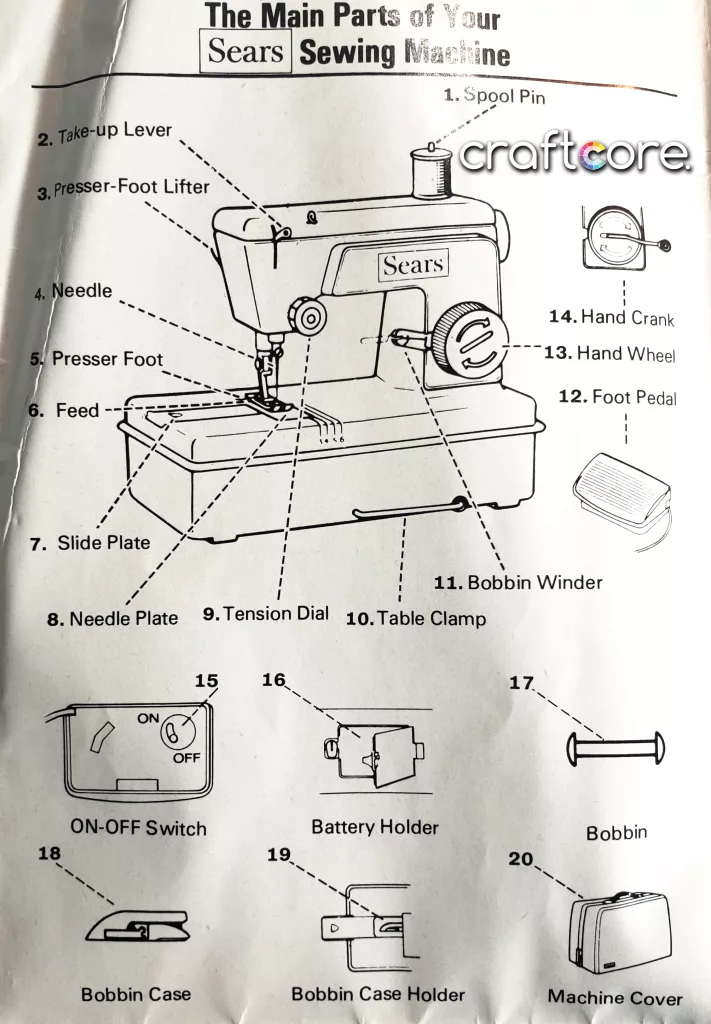
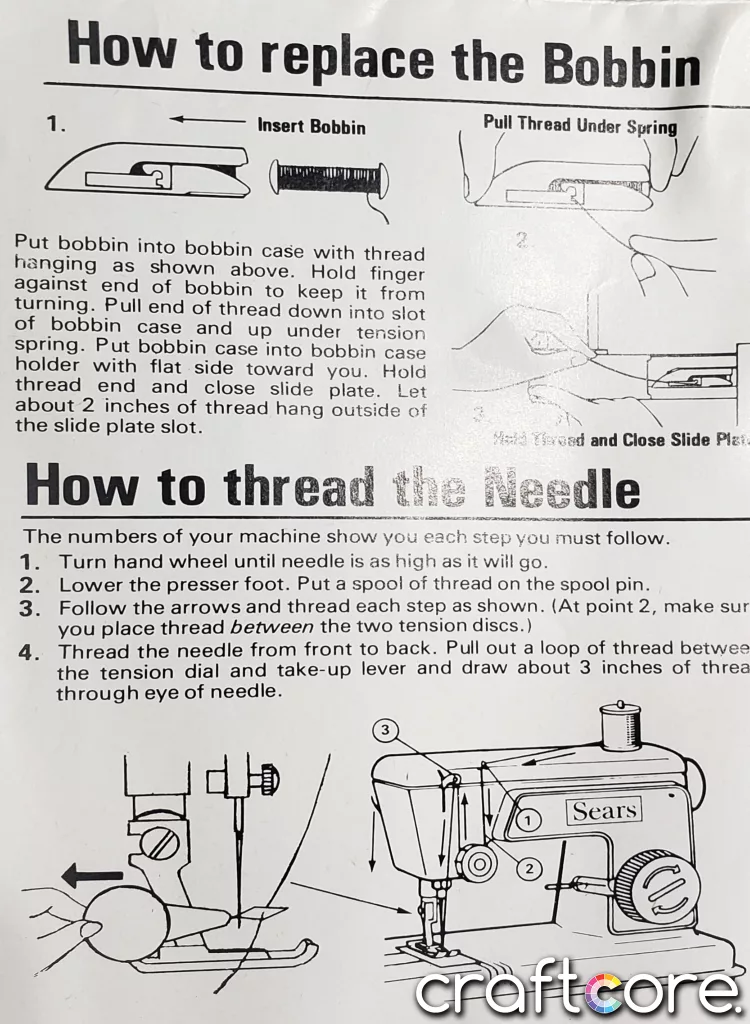
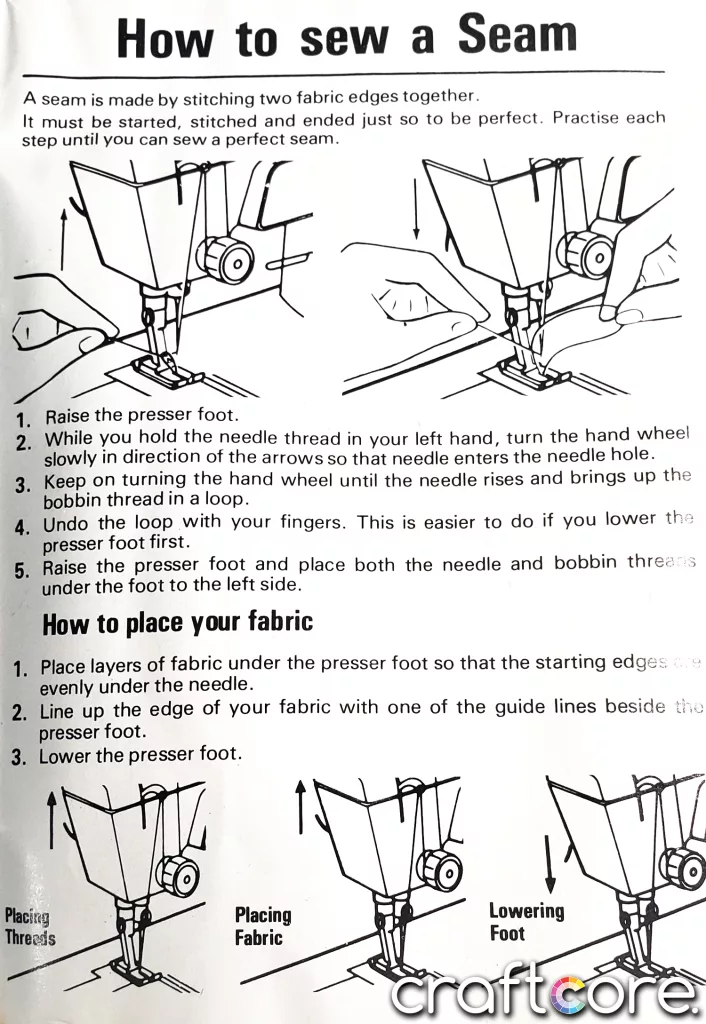
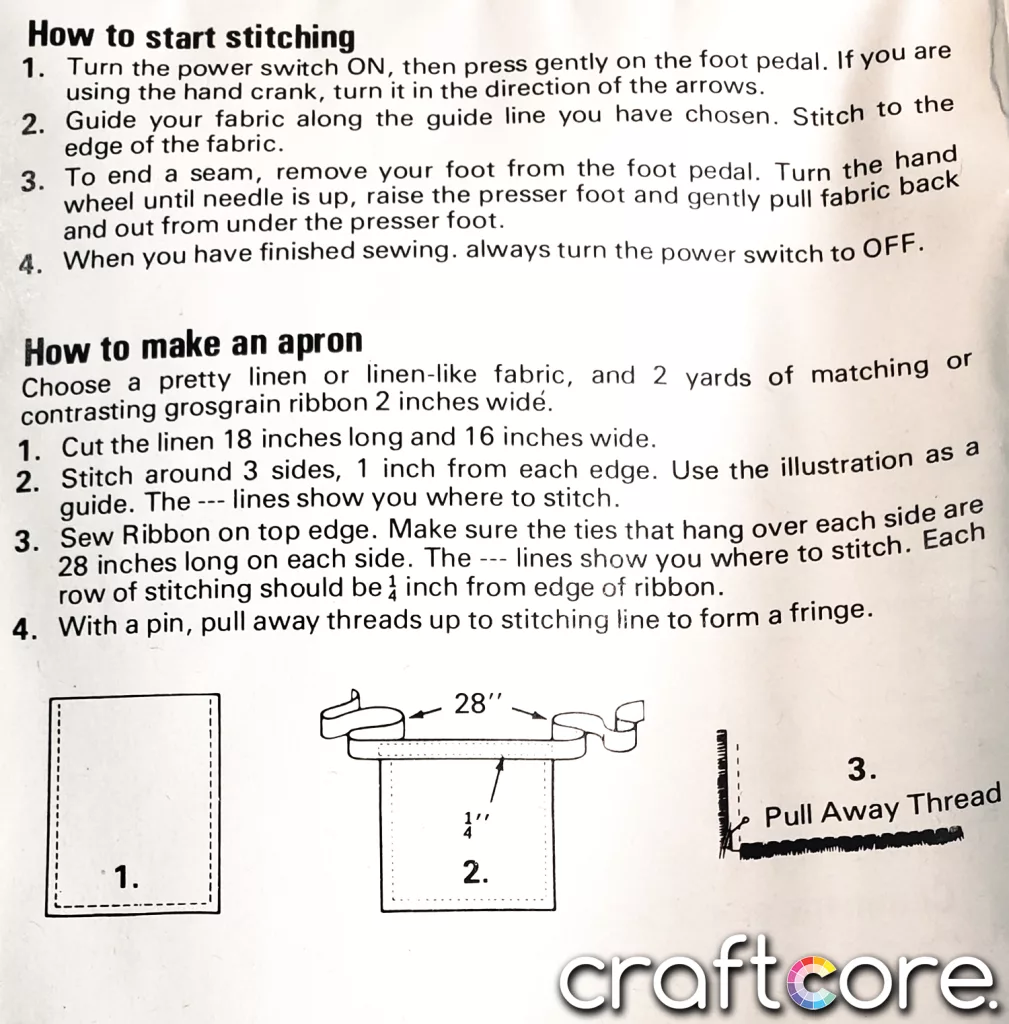
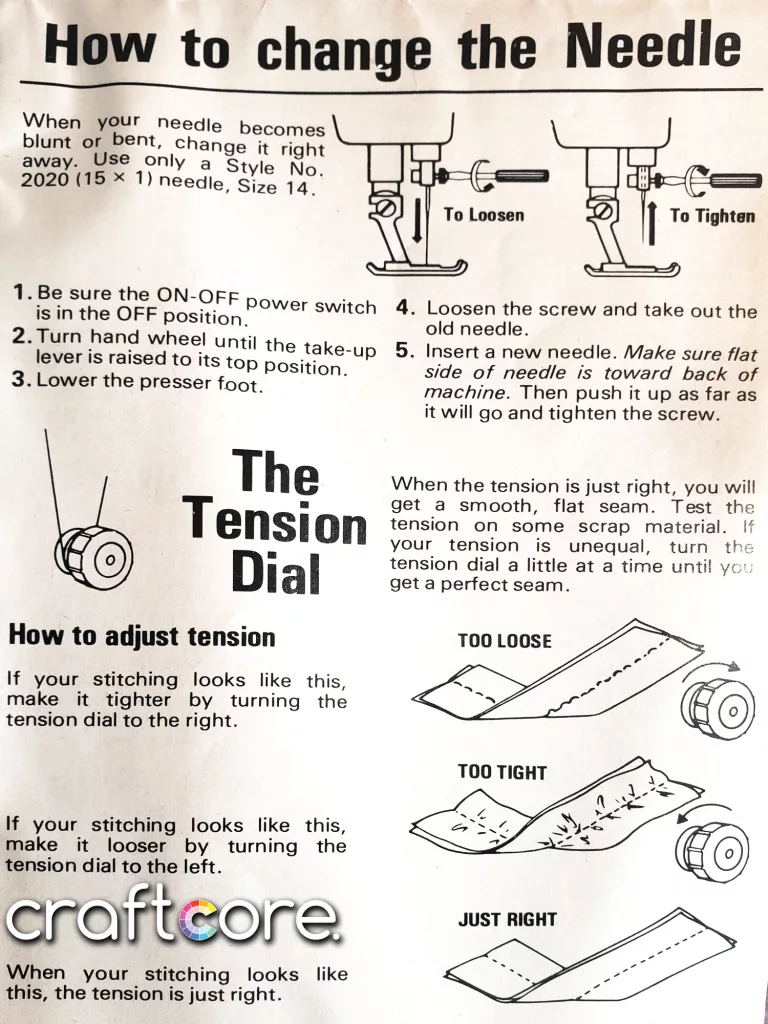
Sears Lockstitch Child Sewing Machine – Manual
Here are some photos I took of the manual. Apologies for the low quality images, I took these in a rush and no longer have access to this machine anymore. I had to downsize my sewing machine collection before I moved last year. You can select an image to see a larger copy of it.