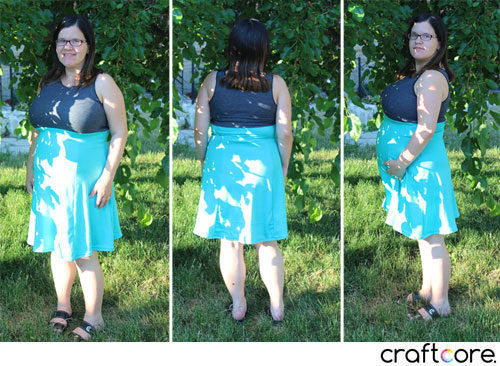
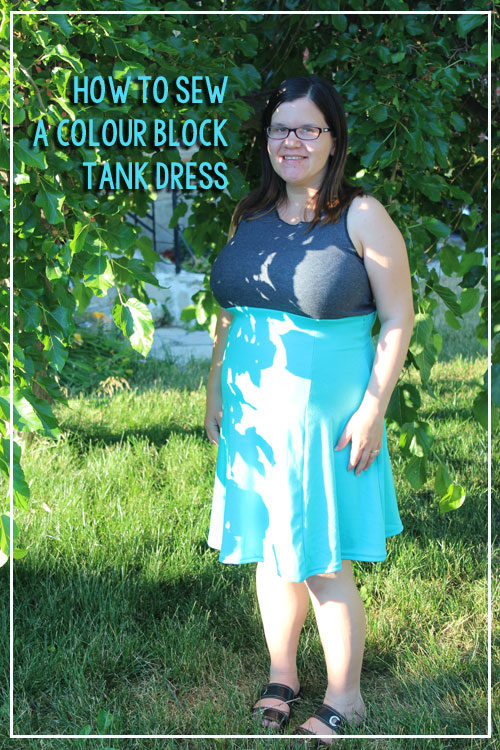
At seven months pregnant, my belly is getting larger and my wardrobe is getting smaller. Time to sew some new clothes! I picked up a few scraps of two different solid knit fabrics (one grey, one blue) from the thrift store on the cheap – not enough to make a full dress, but enough to make a shirt and a skirt. I prefer dresses to separates, so I decided to combine these two textiles together into a simple colour blocked tank dress that’s easy to wear. This tutorial will teach you how to make a stretchy tank dress with an empire waist, using a tank top as a template for the bodice. It’s a maternity-friendly pattern / tutorial, but it is definitely not strictly maternity!
Supplies:
- Tank Top for Reference
- Knit Fabric in two colours – amount depends on the calculated pattern
- Serger
- Sewing Machine
- Thread
- Typical Sewing Notions (pins, scissors, measuring tape, etc)
Cutting out the Bodice
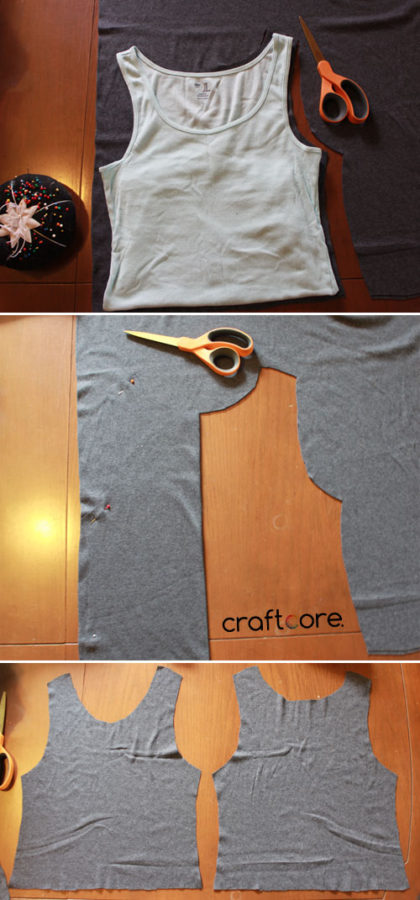
First things first, find a tank top that fits you well. Check the stretchiness of your tank top. Compare it to the stretchiness of the knit fabric you have. The fabric needs to be at least as stretchy as the tank top otherwise you won’t be able to fit it on.
Put it on and pin to indicate the length you’ll need for the tank to reach just under the bust. Add 5/8″ to the length for seam allowance. Take off the tank top and fold it under at the determined length.
My grey knit fabric came in a tube, so I simply laid out the tank top on top of the double layer, then started tracing to cut out the tank pattern starting from the bottom and working my way to the middle of the neckline. I took away the tank top, then folded the fabric over and pinned in place so I could get the exact mirror image of the top.
After cutting out the two shapes, I cut the neckline down further on one of the pieces so this would act as the front piece. I wanted the neckline to be a little higher than on my original tank top for extra coverage.
Assembling the Bodice
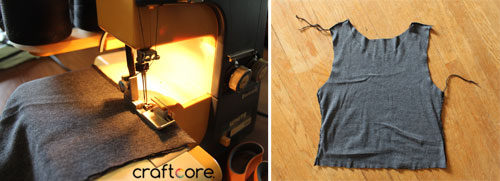
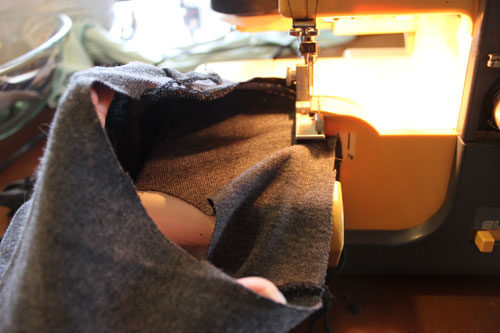
Sewing together the bodice is easy. Layer the piece bodice pieces right sides together. Serge (or stretch stitch with a sewing machine) the side seams and the straps.
Try on your bodice and make sure it fits well. If you have a fuller bust like me, the length of the back may be much lower than the length of the front which is very obvious in this colour blocked style. Ask a friend to help chalk or pin mark any length adjustments you want to make in the back, being sure to make it a smooth transition, then trim it down. Remember to keep the length 5/8″ longer than you want it to be finished so that it won’t end up shorter than expected.
Preparing the Skirt
It’s time for a little math!
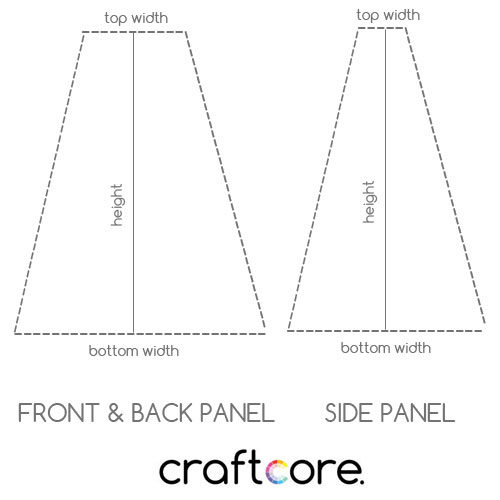
I designed this dress with a six panel skirt. Four of the panels are smaller and the front and back panels are wider.
Calculating the Height Measurement
Measure from under your bust to the desired length of your dress. Add 1 7/8″ to this measurement. This will be your Height for both the side panels and the front and back panels.
Calculating the Top Width Measurement
Measure the bottom of the bodice from side seam to side seam. The bottom of my tank top measured 12.25″.
Multiply that measurement by 2. In my case, it was 24.5″.
Add 7.5″ of seam allowances for six panels to this measurement. (Each panel requires 5/8″ on each side, or 1.25″ inches of seam allowance each.) In my case, the total was 32″.
The sizes of each of the panels can be variable. I made my four side panels 14% of my total width. I made my two front and back panels 22% of the total.
SIDE PANEL (x 4) TOP WIDTH: 32″ x 0.14 = 4.5″
FRONT AND BACK PANEL (x 2) TOP WIDTH: 32″ x 0.22 = 7″
Check and make sure your measurements add up to your total bodice width. For example: 4.5″ + 4.5″ + 4.5″ + 4.5″ + 7″ + 7″ = 32″. You may need to adjust the measurements slightly to round them up or down to easier-to-cut increments. Just make sure it adds up to the total width.
These will be the Top Width for the side panels and front and back panels respectively.
Maternity Option: If you want some extra room for growing belly, you could make the front panel wider, then gather it when you sew your bodice and skirt together. My fabric was extremely stretchy so I opted out of this feature.
Calculating the Bottom Width Measurement
Put away the calculator: I’ll give you these. I used 13.5″ for the bottom width of the side panel and 17″ for the bottom width for the front and back panels. If you want a fuller skirt than what’s pictured, feel free to make these wider.
Make a Template
On large pieces of paper or cardboard, draw out a template based on the measurements you designed. I find it easiest to start by drawing the height line first. Then a line for top width, centered at the top. Then a line for bottom width, centered at the bottom. Connect the points from top to bottom.
Cut & Sew
Trace your panels onto your knit fabric, being sure to keep the pieces aligned with the grain of the fabric to optimize your stretch. Cut 4 of the side panels and cut 2 of the front and back panels.
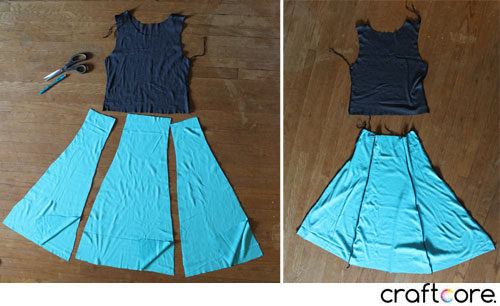
Serge/sew your panels together, sewing them in the following order: SIDE / FRONT / SIDE / SIDE / BACK / SIDE. Sew the first and last sides together as well to create a skirt tube.
Hemming the Neckline and Armholes
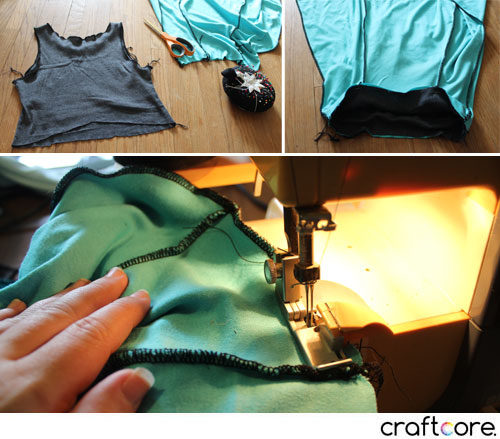
Finish up the bodice by hemming the neckline and armholes. I kept my dress casual by leaving a raw serged edge. (As a new serger owner, I’m really embracing the exposed serged edge!) If you don’t want them raw, turn them over and top stitch or finish with binding as desired.
Sewing the Tank Dress Together
Turn your bodice right side out and turn your skirt inside out. Tuck the bodice inside the skirt tube, right sides together, and serge/sew.
Try it on again and see if you love the fit. If you’re happy, take it off and do the final hemming, turning up the edge 5/8″ to sew a stretch stitch, then turning up again 5/8″ and sew another line of top stitching.
Enjoy your new dress!